

Damage to dies shows up on coins
By F. Michael Fazzari Many things need to come together to make a single coin. Obviously, a die with the coin’s image is very important, but it would be useless…
By F. Michael Fazzari
Many things need to come together to make a single coin. Obviously, a die with the coin’s image is very important, but it would be useless without a planchet and some means to forcefully bring the die and planchet together.
In a previous column, I introduced many of you to the P-D-S System devised by one of the trail-blazing numismatists from my era, Alan Herbert. If you recall, Herbert divided the process of making a coin into three parts in order to describe the characteristics we might find on a finished coin and at what stage of the process they occurred. “P” was the planchet and how it was produced. Earlier, I wrote about defects in the planchet such as adjustment marks, clips and OPSI (original planchet surface imperfections). In the same column, I wrote about the defects found on the finished coin caused during striking – the “S.” Note that due to space limitations I did not mention any of the major types of mint errors such as off-center strikes, and I will not include them here, either. There are many sources on the Internet that do a thorough treatment of mint errors with illustrations.
This leaves us with the “D” part of the system – coin die. There have been several books containing chapters describing the steps taken to make a coining die. A Comprehensive Catalog and Encyclopedia of Morgan and Peace Dollars is a great source for learning the steps of die making and coin production. The ANA Correspondence Course “U.S. Minting Errors and Varieties” by Dr. James Wiles is another good one.
To the best of my knowledge, the latest book on the subject is From Mine to Mint by Roger Burdette. Although I highly recommend it, Roger’s treatment of making coins covers virtually everything (as its title suggests) and may be too detailed for the average collector or coin roll hunter. Nevertheless, I believe after studying any two of these sources, you could teach a class on making coins at your coin club!
Before going further, allow me to condense the die making process, something that would take many pages, into just a few general steps. We’ll start with an approved coin design. Next, a large model is made. This is mounted into a Janvier machine and reduced in size as it is transferred into a cylinder of steel called a master hub. The design on the hub is raised just as on the model, only it is now the size it will be on the finished coin. The master hub makes a master die. This is used to make the “working” hubs that are used to make “working” dies (this is our “D” with the design incused). The “working” dies are used to strike our coins. The image on a coin die is incuse (recessed) and reversed. The image is positive on a hub. There is much more to this process that I have left out due to space. For example, the hubs and dies must be softened (annealed) while they are being made.
Now, excluding mint errors such as doubled dies, what kind of defects can we find on our coins that resulted from an imperfect die?
Consider this: Anything we do to a hub or die by mistake or on purpose that affects its surface will have an effect on the finished coin. So, stop reading and form a mental image of a Lincoln cent.
A hub has a raised design just as the coin. It is impressed into a die. The image on a die is sunken into the die and reversed. That’s a very hard one to imagine unless you’ve seen a die. Any mark into the surface of a hub will transfer as a raised mark on a die producing a sunken mark on a coin.
Any raised defect on a hub, such as rust, will transfer as a sunken mark in the die and a raised mark on a coin. This progression of marks is very important for counterfeit detection. Let’s forget about hubs for now and concentrate on the working dies. Dies are incuse. If they are changed in any way, the result will appear on the coins struck from them. Any abrasion marks from refinishing, impact contact, or pits from rust will go into its surface and leave a raised mark on the struck coin.
One common defect occurs when the obverse and reverse dies come together without a planchet between them. This causes part of each die’s design to be impressed into the opposite die. The finished coin will exhibit unusual marks that do not belong on it (from the damage) that we call a die clash.
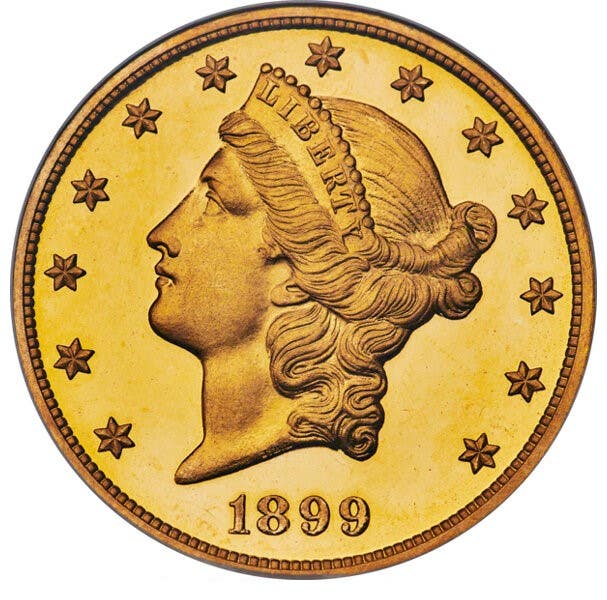
Figure 1 shows a clash mark on the obverse of a $20 Liberty. See if you can find a star and the outline of the rays from the reverse design in the image.
On occasion, a die will break or chip. This allows planchet metal to flow into the newly made void in the die, producing a raised defect on our coin. Chips and die breaks often occur at stressed and weak points in the die’s design. Ruling out a massive, catastrophic failure, most die breaks start out small and progress.
Die Breaks at the rim are called “cuds” by many and come in various forms. If that part of the die does not break away completely, they are “retained” with the break, encircling the design (Figure 2). You can identify a die break from other raised lines on a coin by their squiggly appearance.
Until next time!
This article was originally printed in Numismatic News. >> Subscribe today.
More Collecting Resources
• The Standard Catalog of World Coins, 1601-1700 is your guide to images, prices and information on coins from so long ago.
• With 22,000 listings and nearly 14,000 illustrations, the Standard Catalog of World Paper Money, Modern Issues is your go-to guide for modern bank notes.